Showing posts with label exterior. Show all posts

8.25.2010

Flowered Front Porch

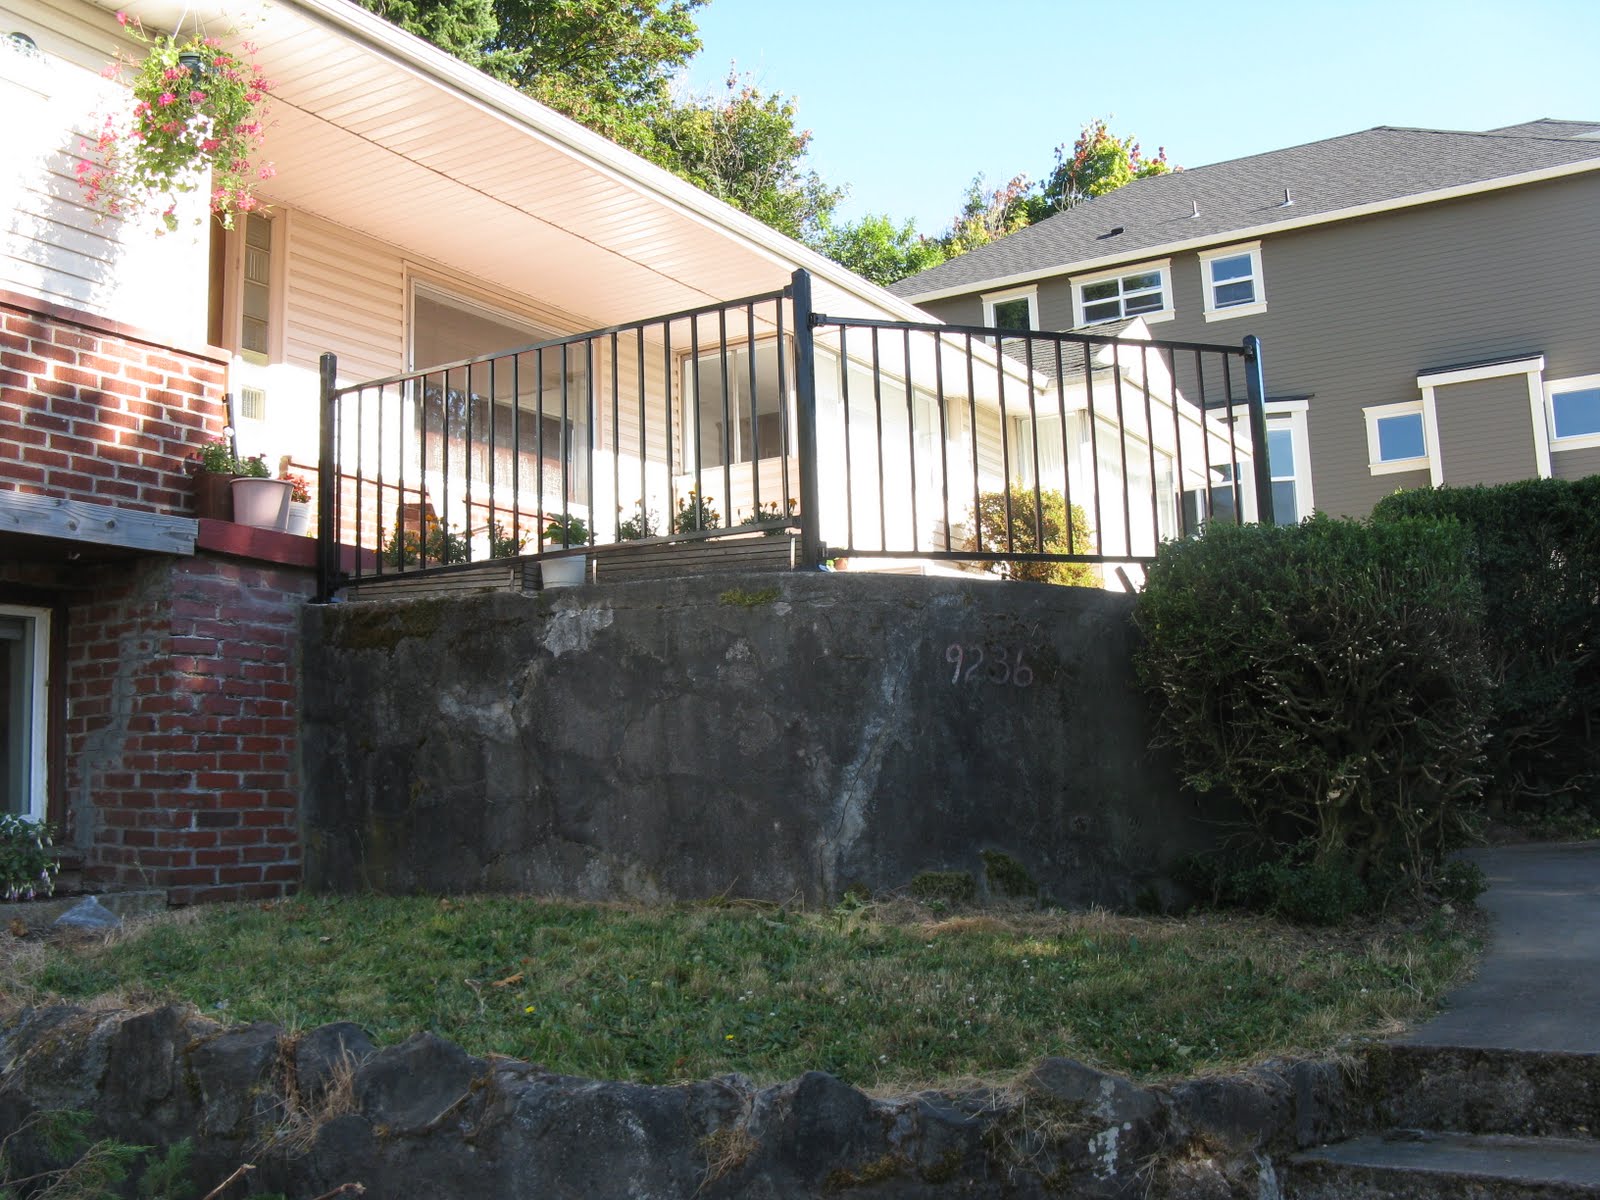
Now that you've seen my new bistro set and the new wrought iron fencing, here's what my front porch area looks like.


I bought bunches of annuals from the best kept secret of my neighborhood, but unfortunately, all of my planters are the old, gross plastic ones.  I was thinking about spray painting them all the same color (like one of those awesome textured spray paints) so they'd go together a little better.  But, until we fancy up the outside (new siding, new windows, new concrete paint that isn't brick red), I don't care that much. It looks like someone actually inhabits this house of ours now! 

8.23.2010

Don't fall...

...off our porch!  I say porch, I mean cement walk way thing that leads to our front door.  If you haven't noticed, our front yard has levels - three to be exact.  To make our insurance company very happy, we decided it was time to install a fence they had asked us to do...oh...11 months ago.

We knew we wanted to use wrought iron, since we felt that it would go the best with our house as it was built in 1948.  The problem is that wrought iron, especially custom made fencing is expensive. Like, seriously.  I called one local company and they would charge almost $2,000 to do what we did below for about $300.  Crazy.  (Granted, custom always looks better...)

So, we found a place that sold wrought iron fencing and, um, creatively made it work with our totally wonky, crooked cement area we do not want small children, elderly, or people sneaking around our house in the middle of the night falling off of (well, that last group might deserve to fall off, I guess).

{We now call our house "the fortress".}


One of the funnest things poor Mark had to deal with was the fact that whole cement area is sloped. There was a difference of 9" from the post nearest the door to the post nearest the stairs. That's a lot. Especially when the fencing you just purchased doesn't account in any way for a slope.  For about an hour we were wishing we'd forked over two grand, but then we used our brains and figured out how it would work and look ... okay. We're pleased with it.  And it will prevent you all from going over!

5.11.2010

W A N T

How CUTE would it be if I had two of these hanging on my front porch??

Seriously. I love hanging seats, and these would be great!

They're from Ikea (PS Svinga) and they're only $69 each!  You have to be 220 lbs or lighter to set on it though...I think we're safe there.

Here's my inspiration, thanks to lakbdesign/fergusandme.


We've been having the most gorgeous sunsets lately (it's all this crazy, partly sunny/rainy weather) and I can just see us hanging out in our swinging chairs watching the sunset...relaxing...  Well, a girl can dream!

Love, Love, LOVE!

12.28.2009

Exterior...(basically) done!

Mark and I were talking the other day about how in the world we are going to do this remodel.  It is going to greatly effect all three bedrooms and our kitchen...and most stuff needs to happen simultaneously.  So, this is what we decided on...

1 - We will enclose the side patio (new part of master suite).
2 - We will begin working on the new hallway to our master suite (which also will add the new wall in wood room). Once new wood room wall is done (oh, and sheetrocking that room and putting in the new closet doors), we will move into the new "I'm not wood anymore!" room.
3 - Demo will begin on the master suite (finishing the hallway opening, tearing down the wall between the existing room and the patio and ... a bunch of other stuff including closing off the stairs and putting a header in the ceiling for a support wall that will halfway come down).
4 - The new wall will go up, separating the existing dining nook from the kitchen.
5 - Demo and new stairs and new bedroom wall will be put in the other bedroom and that hallway extended in doing those things.
6 - Finish the master suite (including new bathroom) and the "new stairs" bedroom.
7 - Move into my new beautiful master suite!
8 - Demo kitchen.
9 - Beautify and finish kitchen.
10 - Renovate hallway bathroom.
11 - RELAX!

Not so bad, eh? (But remember, plans can and certainly will change!)

Anyway, this is where we're at so far:

Phase 1: Master Bedroom Extension
Part 1: Enclosing patio
Status: Done!


By the way...see how sunny it is!?! Not normal for Christmas time around here!  I'm not complaining, though. (What made his really easy were two things: the patio being an extension of the foundation and the roofline already in place. If those two things didn't happen, we would not have thought about doing this.)

12.25.2009

Getting down to business

Only my husband would wake up on Christmas day and think, "What a perfect day to start remodeling!" He's been outside happily (no joke) hanging new siding (he prepped them by priming and painting each piece in the basement this week and ripped the old siding off at the same time).  Here's some pics of the man and his work (and the sunny Christmas day).


Our siding is going to be "board and batten" style, like this (source):


Mark had this style in his mind since the beginning (he has been itching to get that plastic siding off since we bought the place), but I wasn't quite sold.  It was in Hawaii that I saw a bunch of houses that had that same style on the top floor with brick/stone on the lower floor and I was finally convinced it would look good.

Now, mind you, we are only doing this one side of the house because we are enclosing the covered patio - that whole side will be done and new.  We'll do the rest of the house later. I love mismatched siding. It reminds me of my first car. I think I had three different colors on that thing for a while.

Anyway, back to what I was talking about... Tomorrow, Mark is going to start framing in the enclosure of the side patio (which will become a part of our master suite). So, I guess without further ado, here is the plan!

Our house layout (top floor) currently looks like this (the living room and part of the entry is missing, I know, but we aren't really touching those):


And this is going to be the finished product:


Sorry about the not-quite-to-scale drawings.  The two guest/kid bedrooms upstairs are going to be a little smaller, but they'll be for kids in the future, and if (once we finish the basement) we have two more bedrooms downstairs plus another huge living area...I'm sure they'll have more than enough play room.  As you can see, we are also planning on turning the dining nook into part of the master suite, something I was not willing to do at first, but if we wanted 3 bedrooms upstairs, I had to make a sacrifice. I will gain a nice big window seat in my room - my own personal sunny reading nook (it faces west)!  Overall, I think our plan will work well!!

(We are completely ignoring the basement of our house for now...it's truly a gross dungeon...but we do have plans to tackle it in the future so that all 3200 square feet are fresh and new!)

11.12.2009

Rainy day woes & updates

As is usual for an Oregon November, it has been raining a lot lately.  The previous owners of our house told us that water seeps into the basement when the ground gets really saturated, and we have started to see that happen (basically, it looks like water runs down the walls, then dries up - we don't have standing water or anything like that, but it's still a problem, especially since we want to finish the basement someday).  So, today, on his day off, Mark is going to try and correct what is causing at least some of the problem - the gutter downspouts. He's got a plan - don't ask me to repeat what it is - but basically, the downspouts in the back of the house aren't directed anywhere, so water just seeps into the ground. I think that another part of his fix is going to be putting some "flashing" on the gutters, so the rain actually goes into the gutters, not careening over the edge of them, which is what is currently happening during heavy rains.  Hopefully that will fix part of our water-coming-through-the-basement-wall issue.

Updates:

I - a few posts ago - spelled out three projects that were fairly quick and monetarily painless, so here's where we stand on them:

#1 Living room - My goal was to paint, put shelves up, and buy window hangings for less than $150-200.

We've only tackled the painting and that cost us about $45. We bought two gallons of paint but only used one! I think I might use the other to paint our bedroom when it is finished because it would go well with our bedding.  So, technically, we spent only about $20 so far on the living room.  This weekend, we'll probably do an Ikea run and get the shelves. I will look at window hangings too, but I have been toying with the idea of making my own IF I find a CHEAP fabric that I like.

#2 New Recycling System - My goal was to have a nice easy recycling station, that would probably live in the basement, and possibly buy a food composter.

I originally had the idea to make my own "recycling station", but after determining how much it would cost to make it (not a whole lot, but also my time), we decided to pick up three of these stackable bins with awesome flip up tops from The Home Depot:

They are big enough, plastic (so they are easy to clean) and take up less room than my original idea would.  Plus, I like that even though they are stacked, you just flip up the lid (it's on a hinge) and toss in your recyclables!  Three cost a little under $30 total, so we're doing good so far!  I didn't buy a kitchen composter yet. I want to compost, I really do, but I need to have the outside composter first. 'Cause once that little kitchen bin is full - then what?  I was putting the cart before the horse. So, I'm holding off on this for now.

#3 Cleaning up the basement - My goal here was to organize this beast and to have virtually no $$ leave my pocket.

On Sunday afternoon, we rolled up our sleeves and began this big task and we did pretty good!  I've taken pictures, but haven't posted them yet (sorry). We managed to move things around, broke down a billion moving boxes, swept the floor, and organized a bit.  Mark still needs to organize his tools and work bench and I need to organize my pottery area! (I'm very exited.) We did buy two plastic totes at the Home Depot ($4.88 a piece), so the only $$ we've spent was just under $10. Not bad!

So far, these projects have cost us....

...a whopping...

...$60!!!

I have to say that I'm feeling pretty good about myself right now.
10.31.2009

Happy Halloween!

Happy Halloween weekend everyone!  What are your plans for the spooky weekend?  Well, for us, tonight was our church's Halloween party. People brought food, candy, there was a magic show, prizes for the best costumes (yours truly won one!), a candy walk, bingo, and lots of laughter and fun. In attendance were cowboys, pirates, angels, a witch, a zebra, a 1920s flapper, a nurse, two construction workers, Cat in the Hat, Sherlock Holmes, a hippie, serial murderer, a unicorn, a chef, a werewolf and others.  I'll give you a glimpse of my prize-winning outfit:


Fancy, huh?! It was pretty fun getting all decked out.

Tomorrow, on actual Halloween, I'll have to put my fringe and fishnets away, for the majority of the day will be a work day.  Mark is working on putting a new water line in (the trench through the front yard is already dug) and I'll be raking leaves, cleaning the house and doing load after never-ending load of laundry.  The evening will be spent (I hope!) passing out candy.  I am very excited to have trick-or-treaters for really the first time ever, but I have no idea if we'll have any.  I am prepared, though!!

I'll try my best to post some pictures of our exterior clean-up and Mark's trench tomorrow.  Until then,
HAPPY HALLOWEEN!!


10.21.2009

Our ongoing side project

Make that ongoing outside project!

It's obvious from previous pictures that our landscaping is a wee-bit overgrown.  Well, not long after we moved in, Mark took on the grass and mowed, which actually made a world of difference, but there is much, much more to be done.

Grabbing some gloves and my handy pruners, I first tackled the 8' rhododendron in our front yard and then the ... bushy tree thing next to it. You can kind of see our first brush pile building up behind it.


The bushy tree thing next to it took forever to prune!  There were so many dead branches underneath (and still are) and they were all super skinny and you didn't know where they connected - ahhh - it was the worst!  Anyway, we then tacked the Tarzan vines that entwined one of our fir trees out front.


You can still see what we couldn't reach without a ladder. Those things are tough! (Check out growing brush pile #2!) We're going to have to get out a really tall ladder to finish off those vines.

This evening we started in on the sticker bushes that were surrounding the 5 or so mailboxes at the end of our driveway. Despite a few sticks (Mark got one right in the neck!), we managed to come out on top and removed most of them. They really don't stand a chance against me and my trusty pruners!


Underneath everything, we found a beautiful Japanese maple!  It's actually pretty huge and was getting overtaken by those pesky sticker bushes...but we took care of that problem (see scary photo of me above). Now we only have to remove some Ponderosa Pine branches above it so that it gets a wee bit more light and then it will actually be visible to us and people who drive by! (Sorry for the dark picture.)


A little down, a lot more to go, but it's looking better all the time!

10.19.2009

Finally!

What you've all been waiting for...PICTURES!
Let's start with the outside...

Front of our house...left side.


Front of our house (left side)...another view.


Covered, overgrown, and ugly back porch.


Front of our house (right side).


Another overgrown backyard view.


Our awesome front door + window.


As you can see, things are pretty overgrown, outdated, and just plain ugly!  But we think this house has a good...foundation...so that's something!!  No, I'm joking. It's got good bones and I think we can really make it shine. It's just going to take a lot of time and money and money and time. Oh. And hard work.

And now for some fabulously terrifying interior pictures...

An inside shot of our very cool door.


Mark in front of our huge living room windows.


Another view of our great room.
(Something in this picture became our first remodel project!)


Kitchen. Cool windows. Yellow sink.


Dining nook. Those curtains are already gone.


Andrea's apartment...I mean part of our basement.


So, there is a small glimpse of our huge new-to-us house! I decided not to bore you with about 1,000 square feet of cement-floored basement, three boring bedrooms...actually, one is all wood and quite fabulous:


and two bathrooms. Actually, one of those is pretty photo-worthy too:


You may be thinking...are you sure that is a bathroom? Could it be an entrance to a saloon? (Check out the swinging door...that doesn't go all the way to the top or bottom!)  I promise this interior outhouse is an actual bathroom - complete with working toilet and shower stall! You may ask, where do you wash your hands?  My only answer is, the shower, of course!

We have so many projects ahead of us, we decided to start one that we would actually be able to finish within a week. My next big post will be about that amazing transformation. Prepare yourself to be shocked and amazed!